Policies
Ericom Shield allows an organization to define different policies that best protect the business from external threats while still allowing the business to function. In today’s world, almost every employee needs access to the internet to complete their work. Ericom Shield offers a level of protection out of the box, but it’s possible to go further and define additional policies that provide additional protection. For example, instead of allowing full access to the internet, internet access can be blocked apart from a list of whitelisted sites. Or full access can be granted to all sites, but only downloads from whitelisted sites is allowed. This level of granularity can be achieved by defining policies as described in this section.
Policies can be defined system wide or for an individual domain. IP addresses are also supported in Shield. In addition, there are System Defaults policies and Override policies. The system comes with predefined defaults for each policy. These can be easily changed from the dedicated entry. As for the Override - this is a highly useful tool that enables the administrator full control system-wide. For further information on the System Default and the Override policies, see below.
Policies can be defined per a specific Profile or per the default All profile.
Note
Each update made in this section, once validated and committed, may take a few moments to apply. In addition, is relevant for new sessions only. These changes do not affect running sessions.
The Policies table includes a list of domains and IP addresses, with their defined policies. In the upper bar there is a profile filter and the available actions:
Add New Domain, Delete, Toggle View, Export Policies and Import Policies. In addition, there is a search box, allowing the administrator to search for a specific domain/IP address.

Available Policies
The following policies are available within Shield, either at the System Defaults level or for specific domain:
- Sub-domain – define whether the domain’s sub-domains are included or not. E.g., if example.com is defined as a domain and sub-domains = include, then both west.example.com and east.example.com are included and affected by all policies values defined for example.com. There’s no need to explicitly add them to the domain section.
Note
when sub-domains = exclude, only the exact specific domain will be matched. E.g. if example.com is defined as a domain and sub-domains = exclude, then www.example.com will not be matched by the policy.
Suspend - define if the domain, while in idle state, will be suspended (according to a certain timeout) or remain active. The possible values are:
- Enable - domain will be suspended, when idle, until R/O & R/W timeouts are met (for more details see Resources section)
- 3 available timeouts - 1h/4h/8h
- Disable - domain will remain active until Terminate timeouts are met (for more details see Resources section)
Download – define if a file may be downloaded and sanitized from the specified domain. The possible values are:
- Enable - the file is downloaded (without sanitization)
- Sanitize - the file is sanitized and if sanitization was successful, file is downloaded
- Preview - the file can only be previewed (in a dedicated pdf viewer) but cannot be downloaded
- Disable - file cannot be downloaded, sanitized or previewed
Note
Download policy affect the Print policy. See more details below
Upload - define if a file may be uploaded to the specific domain. Possible values: Enable/Disable
Print - define if a file may be printed. When printing a file, it is downloaded first and then printed, therefore the Download policy affects the Print policy. The possible values are:
- Enable - printing is always possible, regardless of the Download policy
- Protected - printing is allowed only if download is allowed (either Enable/Sanitize). If Download is not allowed then printing is disabled as well
- Disable - printing is completely disabled
Clipboard – enable or disable the clipboard usage
Note
Clipboard policy affect both texts AND images. Disabling the clipboard will prevent copying and pasting of texts AND images to and from the remote browser. In this case these options are available internally (within the remote browser only).
- Cookies – enable or disable the usage of cookies (bi-directionally)
Note
Since most sites use some form of authentication using cookies, globally blocking cookies will make these sites unusable. However, the main reason to block cookies is to prevent tracking cookies, leading to malvertizing and retargeting (receiving annoying ads based on past searches etc.). As blocking all cookies may cause issues with some sites needed by the organization, a policy of black and white lists can provide the best of both worlds.
- Block Ads - enable or disable ads on websites. Ads might consume resources and decrease performance so blocking them is highly recommended (enabled by default).
Note
Some sites might not function properly when ads are disabled. To solve this, first verify that it is indeed related to Block Ads. If this is the case, add a specific policy for each such site to enable ads in it (Block Ads = Disabled). End user can disable ads locally, while browsing, using the right-click-menu option Pause AdBlock & Reload. This will affect current session only.
Certificate - verify that HTTPS domains have a trusted certificate, ignore any certificate related errors (less secure) or block once certificate errors are found.
Rendering - when the URL includes media streaming in it, there are 2 possible ways to handle it:
- Stream - the media elements are streamed directly. All other elements are transferred as frames.
- Frame - all elements are transferred as frames. While
Framemight be considered slower then streamed, it is assumed to be more secure.
There is another option, named Crystal. This is in tech-preview mode (alpha-stage) and is currently recommended only for customers and partners that are part of the Alpha Program.
Access – define whether the domain is:
- Shield - opened via Ericom Shield
- White - opened without going through the Ericom Shield system
- Black - completely blocked
System Defaults

The System Default policies are displayed in the dedicated row (in green) in the upper section of the Policies table. By default, all new domains are related to the All profile.
Use the Toggle View option to show/hide this section.
To update an option within the System Default policies, click the dropdown list for the policy and set the new value. This will affect all domains in the table that have the default value for this policy. Domains with pre-defined values will not be affected
Override Values
In the case where an organization has many pre-defined domains, there may be a situation where the system Administrator wishes to override ALL policies either permanently or on a short term basis. For example, a blanket ban on file downloads, this may be due to recent security events or a change in company policy. Instead of having to open each policy and amend the required setting, it’s possible to set the override value for the policy, and this will then affect and override ALL domains in the system.

To apply an override, click on the required policy in the override section (red line). A drop down list is opened, displaying the possible values for the policy. Select the desired value and the override value is set. Once an override value has been set, the entire column is marked in red, to visually highlight that an override value has been set. The override value affects the entire system, not only the domains defined in the table.
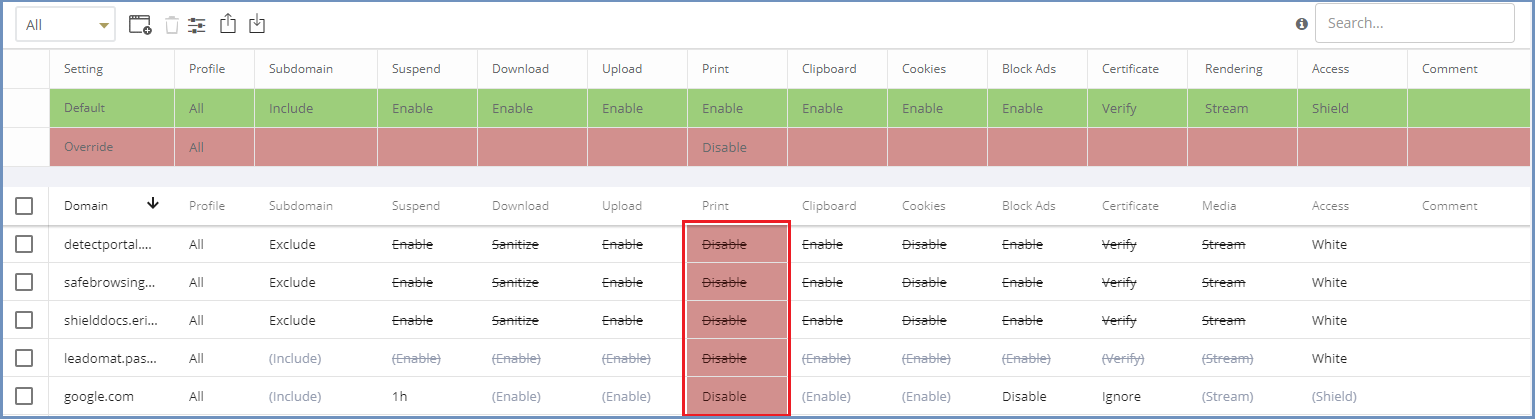
Override values take precedence over existing policies values and provides an efficient way to apply changes quickly thus improving overall protection in times where certain threats may be high.
Note
Override values affect the Categories table as well (but can be modified only from the Policies table).
To remove an override value and return the system to the previous settings, open the drop down values list and select the empty entry.

The override value is removed, and the previously set values are retrieved and displayed in the table.
View Profile Policies
Select the desired profile in the profiles filter to view this profile policies. The available options are according to the profiles defined in the system. For more information about defining profiles, go to Profiles. It is possible to define policies for a certain profile either by adding new policies or by modifying existing ones.
Add New Policies
To add domains to the Policies table, press the Add New Policy icon.

This function opens the following dialog:
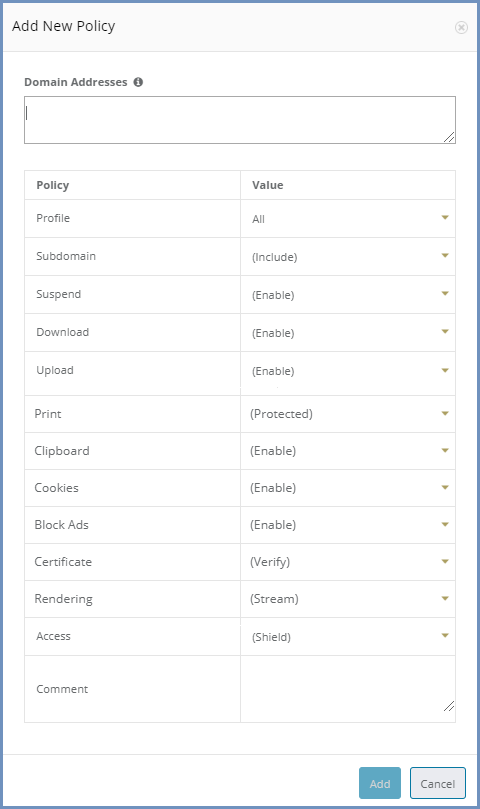
The dialog opens with the current system default options applied (per the selected profile).
Add the domains in the Domain Addresses field. Multiple addresses can be added, separated with a new line.
The domain can be, for example bbc.com, or www.bbc.com. Specific URLs (e.g. http://www.bbc.com/news/) are not supported, as the policies refers to an entire domain.
Define the required option(s) for this policy using the drop-down list of values. Once complete, click the “Add” button.
The added domain names are validates to make sure there are no duplicates. This is to prevent the same domain having different options applied in multiple policies, which might lead to errors in connecting to that domain. Same domain may appear with different profiles. This is not considered a duplication.
If a duplication exists, a message is displayed stating the domain already exists (verified per a specific profile). The dialog remains open, allowing the user to modify the entered details.
Once the validation checks are successfully completed, the dialog closes and the new domains are displayed in the table. Each domain policies will take priority over the System Default policies, except in cases where the override values have been used.
If a domain is marked as white in the Access policy, a notification is issued to the Administrator, confirming that only the specific domain is allowed, and any redirects from this site, will NOT be allowed unless they are also whitelisted. In addition, once the policy is displayed in the table, all settings that are irrelevant for a whitelisted domain are marked as crossed out text.

Update an Existing Policy
Once a policy is added to the table, it can be updated directly from the table itself. All columns are editable. To update a certain domain policy, click the entry to update (one click only) and the entire row become editable.
The Domain and comment columns are free text input fields and the other columns have drop-down lists of values to select from.
Once done updating the specific row – click outside the line (anywhere else on the table) and the updated values are validated (same checks are performed as when adding a new domain) and committed.