Categories
Ericom Shield includes an embedded URL filtering mechanism. Categories can be defined in Shield and assigned with different policies, same as in the Policies section. The categories appear in a table, displaying the related profile and available policies.
Categories are defined per profiles. For more information about viewing profile policies go here.
The Categories table includes a list of categories and their defined policies. In the upper bar there is a profile filter and the available actions:
Add New Category, Delete and Toggle View. In addition, there is a search box, allowing the administrator to search for a specific category.
Available Categories Policies
The categories policies are the same policies defined in the Policies section. For more details go here.
The Toggle View option expands and collapses the Default and Override policies table. This table displays the system default and override values, derived from the Policies section.
These values cannot be modified in the Categories section (as indicated by the displayed message).

Override values set in the Policies section affect categories in the same manner as they affect policies. For more details on defaults and override values, go here.
Intelligent Isolation Mode
Shield comes by default operating in Intelligent Mode, where uncategorized and suspected categories (as defined by the URL filtering mechanism) are Shielded. All other categories are set to white. Some actions are available only in Full Isolation Mode license (e.g. set a category to be Shield, or delete/add categories).
Notifications may appear at the top of the table, with details about current license and mode of operation (Full/Intelligent Isolation). Please follow the information in these notifications to enjoy this functionality to the fullest.
Add New Categories
To add new categories to the Categories table, press the Add New Category icon.

This function opens the following dialog:
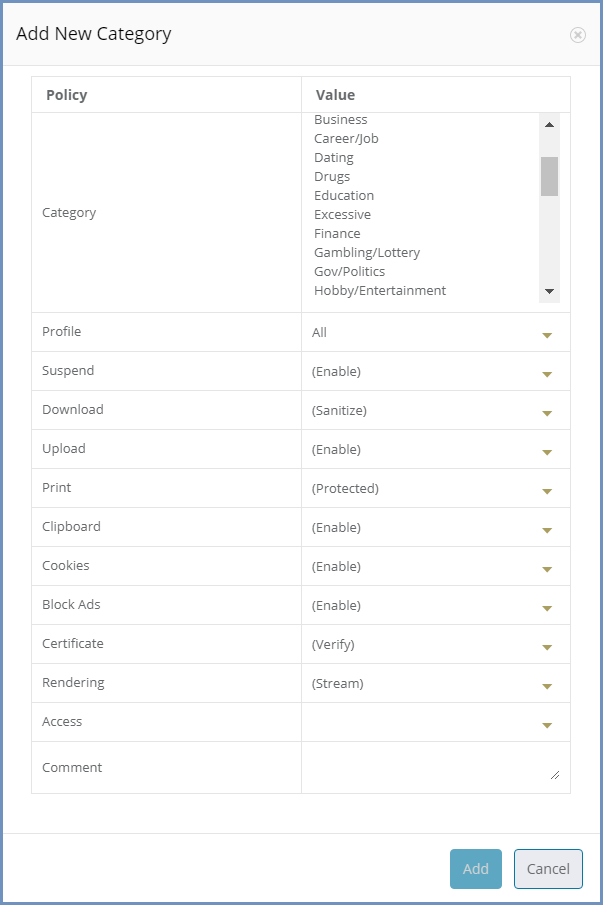
The dialog opens with the current policies default values applied (that match the selected profile).
Select the category from the drop-down list available in the Category Name field. Multi-select is available (using the CTRL/Shift keys), so multiple categories can be added at the same time.
Modify the different policies as desired (by using the drop-down list of values) or leave the defaults unchanged. Once complete, click the Add button.
The added categories are validated to make sure there are no duplicates. This is to prevent the same category having multiple definitions, which might lead to errors when a domain is identified to belong to that category. Same category may appear with different profiles. This is not considered a duplication.
If a duplication exists, a message is displayed stating the category already exists (verified per a specific profile). The dialog remains open, allowing the user to modify the entered details.
Once the validation checks are successfully completed, the dialog closes and the new categories are displayed in the table.
Update An Existing Category
To update an existing category policy, select the desired entry to update and use the drop-down selection for each desired change. Once done updating the specific row - click outside the line (anywhere else on the table). The updated values are validated (verify that there are no duplications) and committed.
Note
Updates to the table may take a few moments to apply and are relevant for new sessions only (does not affect running sessions).
Policies Hierarchy
The more detailed, specific rule which exists in the system - takes precedence.
When the end user browses to a certain domain, these steps are carried out, to determine how to access this domain (and which policies will be referred to):
- First, the domain is looked up in the Policies table. If matched for a specific rule there - act according to the defined policies.
- Else, the domain’s category is looked up in the Categories table. If matched - act according to the defined category policies.
- Else, act according to the system default policies values.
Note
This is true for all domains, apart from domains which are identified as potentially harmful or unsecure. In this case, Shield selects the more secure approach. For more details see here and here.
In the Connections report, each entry includes a Matched Reason column - that specifies the rule that was met (whether matched for Category, Phishing site, Domain policy or default policy).