How To Map External CDR Named Policies Into Shield
For cases where an external CDR solution is used, which is supported in Shield, and includes named policies, it is possible to define these named policies within Shield. To define new named policies in Shield Administration Console, please follow these steps:
- Go to
Settings | Files & Sanitization - Select the
File Sanitization Providerfrom the drop-down list - Verify that the URLs are defined properly
- Open the Named Policy sub-section
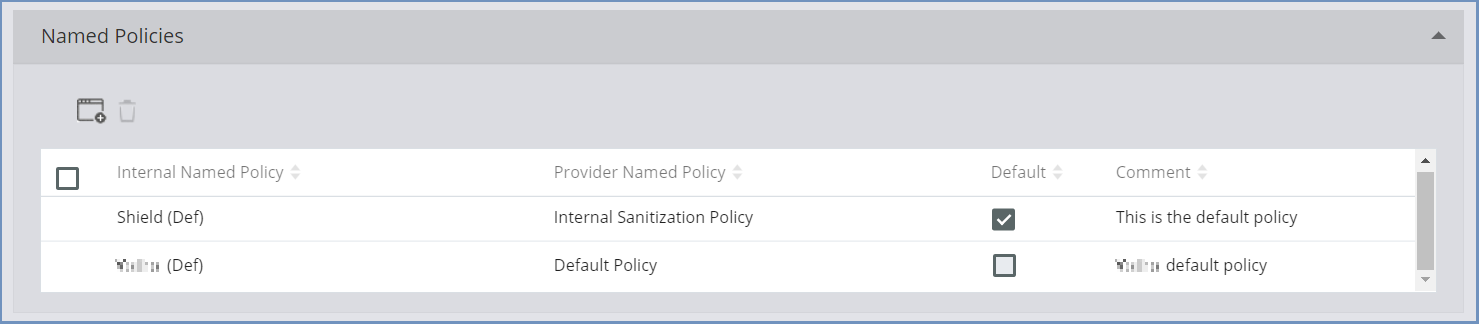
- Select the desired named policy to use as default or add a new named policy.
- To add a new policy, select the
Add New Policyicon at the top of the table and fill in the dialog.
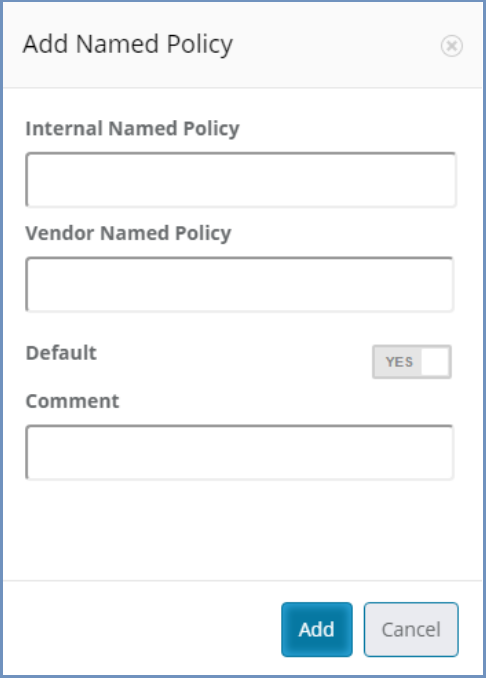
Once the dialog is complete, click Add and the new named policy appears in the table.
Note
The Vendor Named Policy value MUST match the named policy defined in the external vendor solution (outside of Shield).
Once done adding named policies, go to the Policies table and the newly defined Sanitization Named Policies will be available in
the Download policy list of values:
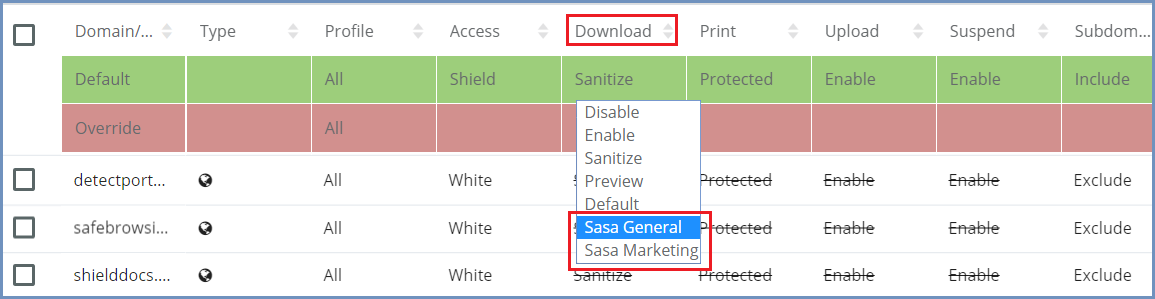
For each domain/category, select which named policy to use, or define the Default/Override Download policy value.
Shield comes with the Shield(Def) named policy set as Default.
The named policy marked as Default is the actual policy used for the Download policy Sanitize option.
In this case, if the download policy is set to Sanitize - the Default named policy will be used as the actual sanitization
policy, meaning all sanitized files will be sanitized according to the definition of the vendor named policy (external CDR solution).
The mapping of vendor named policies within Shield is completely under the responsibility of the Admin user. Shield cannot manage the vendor named policies and no validation is performed regarding the accuracy of the definitions. If the vendor named policy is incorrect - sanitization will fail.
The initial Default named policy (mapped to the default external named policy) cannot be deleted.
In addition, any other named policy, which is selected to be the Default (by marking the checkbox), cannot be deleted.
To delete a named policy which is defined as Default, first define another named policy as Default and only then delete the named policy.
To edit an entry in the Named Policies table, click the desired entry (one single click). The row is now editable and can be modified. After completing the desired changes, click outside of this row (in another place within the table). The row is no longer editable, and the changes have been committed.