Profiles
Ericom Shield supports several authentication methods (basic, Kerberos and DLAP), as per the authentication method used at the customer’s environment. The authentication method and its related settings are defined in the upper section of the page.
If LDAP is defined in the system, Active Directory groups can be supported, in the form of Shield Profiles. This allows pinpoint definitions in the Policies and Applications sections, per specific profile. For more details, see the specified sections. Profiles are created and managed in the bottom section of the page.
Authentication
There are several authentication methods available in Shield: Chaining, Basic, Kerberos and LDAP.
Authentication Chaining
This authentication method is used when user details are previously authenticated by a different component out of Shield system. In this case no additional authentication is required.
Enabled
Enable or disable this authentication method. When this method is Enabled - other authentication methods are automatically disabled (apart from the possible combination with LDAP).
Trusted IP Address
Define the source IP address that is trusted to send user details to Shield. User details are received via the X-Authenticated-User header. In this case, no other authentication is performed.
Please use the following syntax:
- IP address - e.g. 126.0.2.50
- Subnet - e.g. 126.01.1.1/16
- Range - e.g. 126.0.0.0-126.255.255.255
Note
Setting it to 0.0.0.0/0.0.0.0 will allow connection from any address
Basic Authentication
The Basic Authentication includes setting credentials for the user to login to the proxy.
Enabled
Enable or disable this authentication method. When this method is Enabled - other authentication methods are automatically disabled.
Username & Password
Basic credentials (username and password) for proxy authentication.
Message
A customizable prompt message to display to the user while opening a new tab.
Credentials TTL (min)
The credentials Time To Live duration. Once this duration is passed, credentials are required again upon opening a new tab.
Active Directory Authentication
The additional methods of authentication include Kerberos and LDAP authentication. There are common settings, which are relevant to both methods, and specific settings for each authentication method.
It is possible to define up to 2 Active Directories - Primary and Secondary. Only once the primary AD is fully defined it is possible to define a secondary AD.
Users can connect to Shield both in the UPN format (e.g. username@domain.com) and in the SamAccountName format (e.g. domain.comusername). This is possible on all Active Directories (primary & secondary).
Primary Active Directory Settings
Groups the following settings, which are common to both Kerberos and LDAP.
Domain
The Active Directory Domain name to connect to.
DC Address
The IP Address of the domain controller to connect to. Multiple values can be defined, separated by a comma “,”.
Secured DC Communication
Select if the communication with the domain controller should be secured by SSL or no (LDAP/LDAPS).
Base DN
The root of the domain controller, separated with commas (e.g., DC=COMPANY,DC=LOCAL)
Note
To connect the Active Directory to Shield, a designated user needs to be created. This user credentials should be filled in the matching fields described hereunder.
Domain Username
Enter the username of the designated Shield user in the Active Directory. Username only (e.g., “shieldUser”), no domain, no suffix.
Password
Enter the password of the designated Shield user in the Active Directory.
Alternate UPN Suffix
Alternate UPN Suffix of the domain controller. Multiple values can be defined, separated by a comma “,”.
Note
If the domain name is domain.com and the defined suffixes are e.g. domain, ABC then a user called george can connect to the system in the following ways: george@domain, ABCgeorge, domain.comgeorge etc.
Add Secondary Active Directory - select this option (only after the Primary AD is fully defined) to define a secondary Active Directory. When this option is selected, a new sub-section appears, named Secondary Active Directory Settings which includes the same settings as for the Primary Active Directory.
In case a Secondary Active Directory is defined and needs to be removed, select the option Remove Secondary Active Directory. A confirmation dialog will appear and once confirmed the Secondary Active Directory will be removed.
Note
All other changes done in this section will be commited by the Remove Secondary Active Directory operation
Kerberos
The Kerberos settings include the following settings:
Enabled
Enable or disable this authentication method. This method can be enabled with LDAP only, otherwise - other authentication methods are automatically disabled.
Service Principal Name
A unique identifier of a service instance. Used by the connecting browsers for authentication. Constructed from the proxy hostname and the domain name (Active Directory domain name, always in UPPERCASE). The hostname must be known in the DNS. It is VITAL to verify that there is only one hostname associated with the specific IP (nslookup [IP]).
The correct syntax is: HTTP/<hostname>@<domain> (e.g. HTTP/Shieldnode.company.local@COMPANY.LOCAL)
Keytab
Select the Generate option. A pop up is opened with a command:
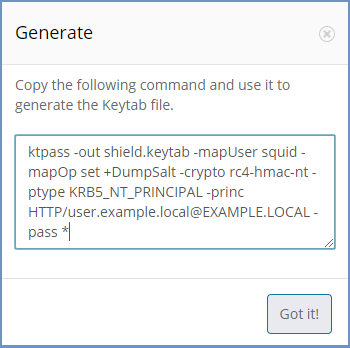
Copy this command and use it to create the Keytab file. Once done, select the Keytab file and upload it to the admin. If a Keytab file already exists, upload is directly. It is essential that the Keytab file matches the same machine specified in the Service Principal Name.
Fallback to NTLM
Select whether to use NTLM as a fallback mechanism in case an error occurs during Kerberos authentication.
LDAP
The LDAP settings include the following settings:
Enabled
Enable or disable this authentication method. This method can be enabled with Kerberos or Chaining authentication methods only.
Proxy Message
A customizable prompt message to display to the user while opening a new tab, to login to the proxy.
Use Active Directory Profile For Admin Login
This setting is visible only if LDAP is enabled. Define whether to login to the Admin Console using LDAP profiles or not (in this case use the default user). If set to Yes, define the Active Directory group of users that may login to the Admin Console. This option is available only if LDAP is properly defined and all related settings were saved. Prior to this, LDAP groups cannot be retrieved.
Note
Once this setting is set to Yes, login to the Admin Console will be done using AD profile only. It is CRUCIAL that the LDAP is enabled in this scenario.
Active Directory Admin Users Group
Select the Active Directory group of users that may login to the Admin Console (from the list of LDAP groups). This setting must have a value if the previous setting is set to Yes. Start to type the name of the desired group to get the list of groups. Once the list is retrieved, select one group of users that are allowed to login to the Admin Console.
Note
The list of LDAP groups is displayed only is LDAP is properly defined and all its relevant settings are saved.
If LDAP or Kerberos authentication is Enabled - then the Basic Authentication is automatically disabled.
Both authentication methods (Kerberos / LDAP) can be enabled simultaneously.
Note
When using Kerberos - the proxy server MUST be referred to by its name (not by its IP address). When users connect to the proxy, it should be done by the server name only. In addition, it is VITAL to verify that there is only one hostname associated with the specific IP (nslookup [IP]). In other words, the Linux machine must be registered with DNS in order for Kerberos Authentication to work correctly.
Shield requires a dedicated user account for authenticating domain users using Kerberos protocol and performing LDAP group lookups. For detailed instructions (including a working example) go here
The more authentication methods that are enabled (Kerberos/LDAP) - the less frequent users will be prompted to enter credentials. This is because the browser can easily select the best method to authenticate and only prompt the user to authenticate if that method fails. For example, a user accessing the proxy on a domain joined machine, the browser would first attempt to authenticate via Kerberos. If successful, then the page is displayed without the need to prompt for authentication.
Once all settings are filled in and saved, it is possible to create Profiles and define relevant policies for each profile. For more information, please see below.
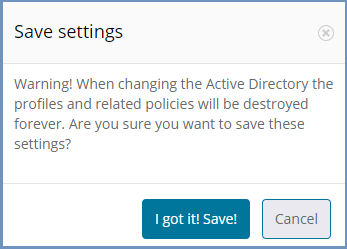
Updating Existing Settings
When updating existing information in the Authentication Settings section (e.g., Domain/Base DN fields) - This action will remove all the defined profiles and any related policies will also be deleted. Once removed, these items cannot be restored, they would need to be re-entered. It is crucial that any update is applied carefully to avoid losing important configuration. Other fields can be updated as required without affecting the profiles or policies. If an update will result in these items being removed, then the following message is displayed:
Validation checks are performed only for the Enabled method of authentication. If the updated information is not valid or incorrect, an error message is displayed.
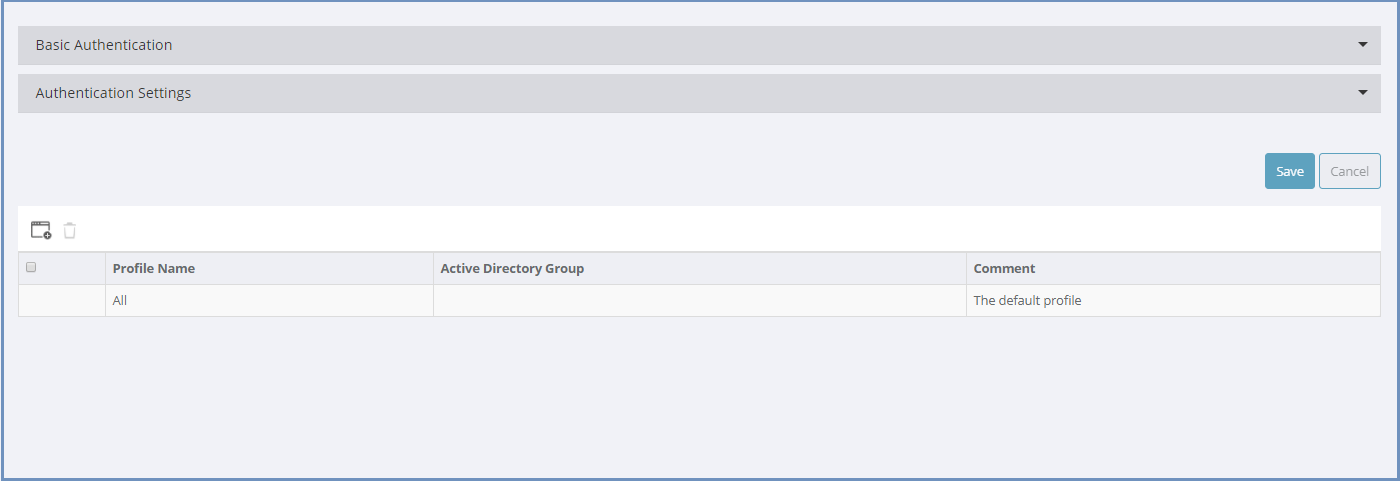
Profiles Table
This table displays existing profiles defined in the system. Profiles are assigned to Active Directory Group(s) which allows the Administrator to apply separate policies to
different users based on their specific group membership. The available actions are: Add New Profile, Delete Profile & Refresh.

The table includes a default profile named All. All policies (URL’s) defined in the policies table, that are not related to a certain profile - are by default related to the All profile.
Select the Add New Profile option to create a new profile. Enter a profile name and associate it to one or more Active Directory group(s). The Comment field is optional.
Note
This option is only available if the LDAP Enabled setting is set to Yes, else - the option is disabled.
Once a profile is created, it is possible to define policies and assign the policy to this Profile. For more information about setting profile’s policies, go to Policies.
To edit an existing profile, select the specific entry in the table and a dialog appears with the profile details. Modify the fields as desired. All fields except Comment must have a value.
If a profile is deleted (using the Delete Profile option), all the related policies are also deleted. Since this action is irreversible, a message is issued to verify the action should take place:
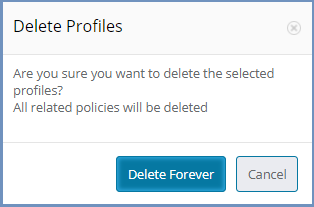
To avoid deleting related policies, view the policies in the policies section first and re-assign any that are still required.
Note
It is highly recommended that each user will be associated to a single Shield profile only. If a user is associated to several Active Directory groups, this will lead to several Shield profiles, which may lead to inconsistent Shield policies enforcement. When this it the case, a warning message appears in the Dashboard, explaining the issue at hand.
For advanced configuration, using more than one authentication method, go here.