Post Installation Steps
End User Configuration
After deploying Ericom Shield, the system is ready to use. In order to start browsing securely using Ericom Shield, the Browsing Traffic should be sent to a proxy server.
If a proxy server is already in use (for caching or content filtering purpose), this proxy should be configured to work with Ericom Shield.
Alternatively, the browser will be configured to use the Ericom Shield built-in Proxy.
Proxy Configuration
There are several options to configure the proxy. It can be done at the single user level or at the group policy level to affect all users. Available options are detailed hereunder:
Set the Proxy Using Group Policy
- Open Group Policy Management Console - Press the Windows logo key + R to open the RUN dialog box. Type gpmc.msc in the text box, and then click OK or press ENTER.
- Find an existing or create a new GPO to contain the proxy settings (more information can be found here ). Ensure that the GPO is associated with the domain, site, or organizational unit whose users you want affected by the policy.
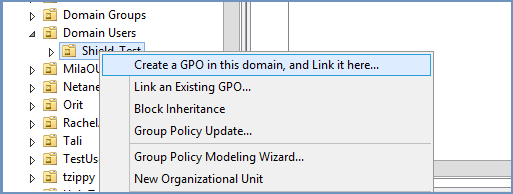
- If a new policy was created, provide a name for the policy. The Group Policy Management Editor opens, displaying the current content of the policy object. In the right pane under the Settings tab | User Configuration right click and select
<Edit>.

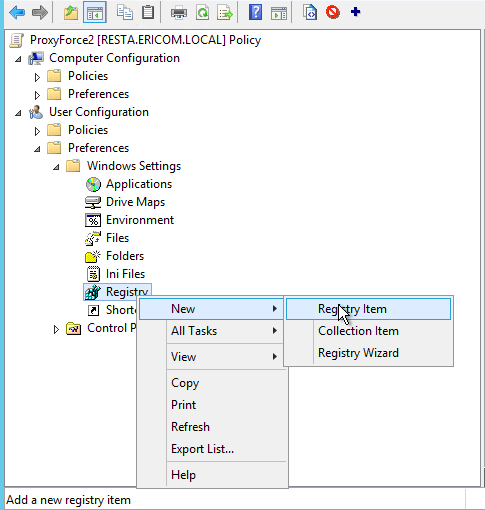
- Expand the User Configuration | Preferences | Windows Settings | Registry
- Create a new registry item: right click on
<Registry>and create a New | Registry Item
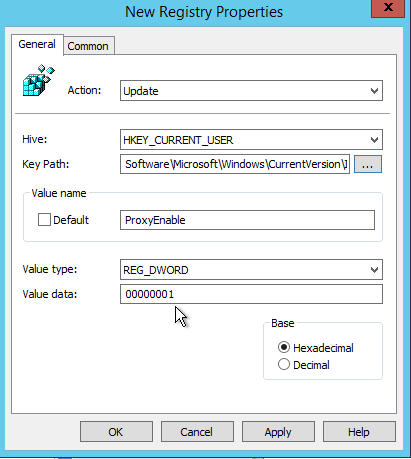
In the dialog, under the Key Path click on
< ... >and go to HKCU\Software\Microsoft\Windows\CurrentVersion\InternetSettings\ProxyEnableCreate a new Value Name: ProxyEnable
Value type: REG_DWORD
Value data: 00000001
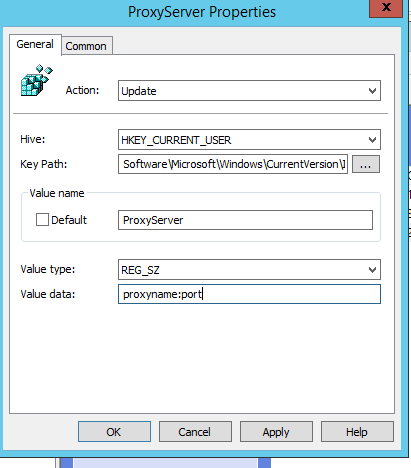
Create a second registry item with the following values:
Value Name: ProxyServer
Value type: REG_SZ
Value data: proxyname:port
Note
Replace proxyname:port with the <DNS>:<PORT> of your Shield server, e.g. shield.company.local:3128 The DNS name should be the clustered address name for the Shield Proxies if Kerberos authentication is also being used.
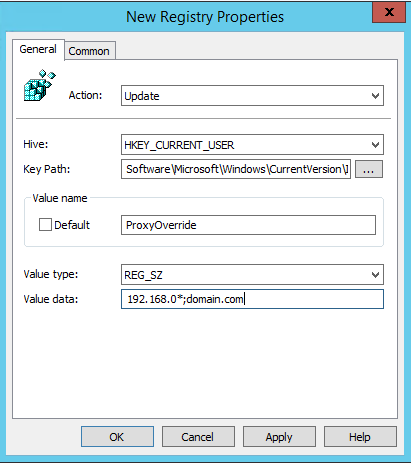
Create a third registry item with the following values:
Value Name: ProxyOverride
Value type: REG_SZ
Value data: <local addresses>
Note
Replace <local addresses> with any local address on your network that you wish to exclude, e.g. 192.168.0*;domain.com
Note
More information can be found here
Set the Proxy Using PAC File with Group Policy
- Open Group Policy Management Console.
- Find an existing or create a new GPO to contain the proxy settings. Ensure that the GPO is associated with the domain, site, or organizational unit whose users you want affected by the policy.
The Group Policy Management Editor opens, displaying the current content of the policy object.
In the right pane under the Settings tab | User Configuration right click and select <Edit>.
- Expand the User Configuration | Preferences | Windows Settings | Registry.
- Create a new registry item: right click on
<Registry>and create a New | Registry Item
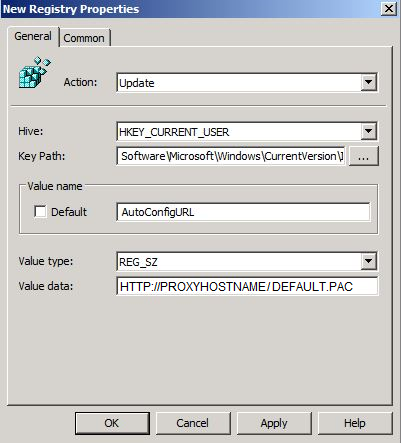
In the dialog, under the Key Path click on
< ... >and go to HKCU\Software\Microsoft\Windows\CurrentVersion\InternetSettings\ProxyEnableCreate a new Value Name: AutoConfigURL
Value type: REG_SZ
Value data: <your pac file>
Note
Replace <your pac file> with the location of your file, for example: if you would like to use the Ericom Shield environment to host your PAC file, enter the address as… http://ShieldHostname/default.pac
Configure Firefox To Use Shield Proxy Using PAC File
Since Firefox settings are separated and are not affected by the Windows system definitions, using the proxy defined in the PAC file does not affect it automatically. To configure Firefox to use the proxy defined in the PAC file (after defining the GPO for it), follow these steps:
Place the
shield.cfgfile in the root of the Firefox directory. E.g.:C:\Program Files\Mozilla Firefox\shield.cfg
Place the
autoconfig.jsfile in the defaultspref sub-directory. E.g.:C:\Program Files\Mozilla Firefox\defaults\pref\autoconfig.js
In
autoconfig.jsadd these lines:pref("general.config.obscure_value", 0); pref("general.config.filename", "shield.cfg");
In
shield.cfgadd this line:lockPref("network.proxy.autoconfig_url", "http://ShieldHostname/default.pac");
lockPref(“network.proxy.type”, 2); lockPref(“network.proxy.no_proxies_on”, “localhost, 127.0.0.1”);
Note
These files should be ANSI encoded. Please change the path of the PAC file to use local PAC file. In addition, specify the internal addresses to be excluded.
Set the Proxy at the Browser
Select your browser of choice and define the Proxy Settings to use the <ShieldHostname> and port 3128.
Set the Proxy Using PAC File
It is possible to set the proxy to use a Proxy Auto-Config (PAC) file. Ericom Shield comes with a default PAC file that can be used out of the box.
To use the default PAC file, use the following path: <http://ShieldHostname/default.pac>. For more information, select the browser of choice.
Changes can be made to the default PAC file as needed, once the changes have been made, upload the new PAC file using the Administration Console (Settings | PAC File section).
Select your browser of choice and define the Proxy Settings to use the PAC file.
Certificate Configuration
In order for Shield to handle HTTPS domains, the following certificate needs to be imported into the client machine (Local Computer). This can be done via Group Policy or manually. Download the Ericom Shield Certificate in one of the following ways:
- Download from
here - Open a Shield browser and go to here
- Open a browser and go to:
<http://<ShieldHostname>/install-certificate>
Install Certificate Using Group Policy
- Open Group Policy Management Console.
- Find an existing or create a new GPO to contain the certificate settings. Ensure that the GPO is associated with the domain, site, or organizational unit whose users you want affected by the policy.
- In the right pane under the Settings tab | Computer Configuration click
<Edit>.

- The Group Policy Management Editor opens, displaying the current content of the policy object.
In the navigation pane, open Computer Configuration | Policies | Windows Settings | Security Settings | Public Key Policies | Trusted Root Certification Authorities. Right click and select <import>.

- Select the Shield certificate file and import it.
After importing the certificate, right click the GPO and select “enforce”.
Link between the computer and the certificate:
- Under Domain Computers, create a GPO to represent the computer that will be connected to.
- Right click this GPO and select
<Link an Existing GPO>and select the certificate GPO.
Note
More information can be found here
Configure Firefox To Use Shield Certificate
Since Firefox settings are not affected by the Windows system definitions, the certificate that is defined in the GPO does not affect. To solve this, Firefox should be configured to trust certificates in the Windows certificate store. Once the GPO is defined for the Shield Certificate, follow these steps (skip first 2 items if files already exist in the system):
Place the
shield.cfgfile in the root of the Firefox directory. E.g.:C:\Program Files\Mozilla Firefox\shield.cfg
Place the
autoconfig.jsfile in the defaultspref sub-directory. E.g.:C:\Program Files\Mozilla Firefox\defaults\pref\autoconfig.js
In
autoconfig.jsadd these lines:pref("general.config.obscure_value", 0); pref("general.config.filename", "shield.cfg");
In
shield.cfgadd this line:pref(security.enterprise_roots.enabled", true);
Note
These files should be ANSI encoded.