Online Installation Via Scripts
The recommendation is to set up a dedicated Linux machine that will be used for cluster deployment and management. This machine will be referred to as the Rancher Server machine. This machine will include all the internal components (e.g. Kubectl & Helm). The Rancher Server can be a separate machine or on one of the Master machines (running etcd & Control Plane). All other nodes in the system are determined by the deployment type.
Before you begin, follow the steps detailed in Machine Preparation.
Prepare The Rancher Server
Note
Shield repository requires a valid PASSWORD. Before you continue, contact Ericom Shield Professional Services to get a valid password.
On the Linux Rancher Server machine, download and run this service:
curl -s -o install-shield.sh https://raw.githubusercontent.com/EricomSoftwareLtd/Shield/master/Kube/scripts/install-shield.sh
chmod +x install-shield.sh
sudo ./install-shield.sh -l -p <PASSWORD>
This command will run Rancher (-R) with all the labels (-l) and use the latest (online) Shield repository.
Prepare The Server Nodes
Each server node that takes part in the Shield cluster must be prepared before creating the cluster. From the Linux Rancher Server machine run:
./shield-prepare-servers [-u <USER>] <ServerIPAddress(s)>
Replace the USER with the user that matches ALL nodes. Replace the ServerIPAddress(s) with the list of IP addresses of the system nodes. Multiple IP addresses may be entered, separated by a space (" ").
E.g.:
./shield-prepare-servers -u ericom xx.xx.xx.xx yy.yy.yy.yy
Note
The Kernel may be updated during this process (if required).
All the machines should be synchronized. Configure the NTP (Network Time Protocol) and the timezone on the machine on ALL the machines in the cluster.
Connect The Server Nodes To The Cluster Master
Open Rancher at https://RancherServerIPAddress:8443 (using the Rancher Server IP address).
Go To the cluster and select Edit
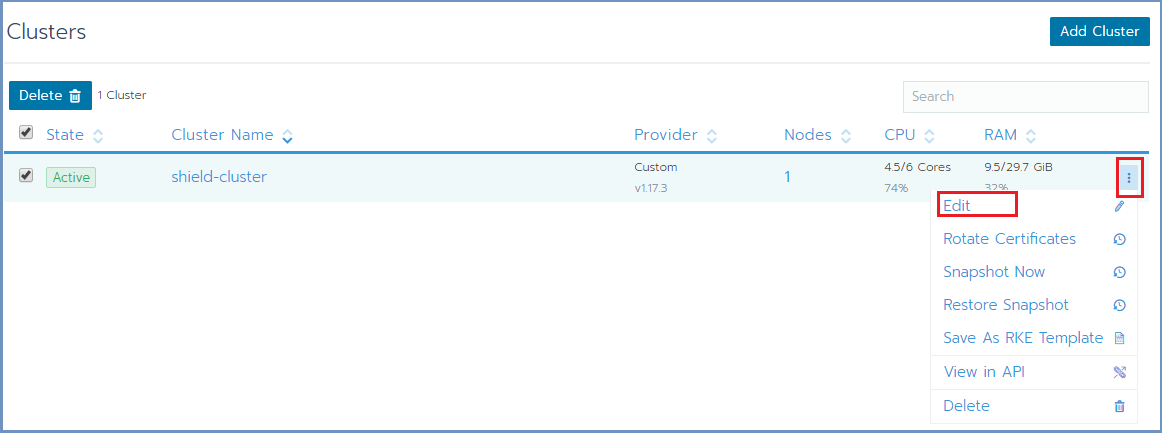
Scroll down to the bottom of the page, mark the required checkboxes (according to the planned deployment) and copy the command on the bottom (using the Copy to Clipboard option in the right).
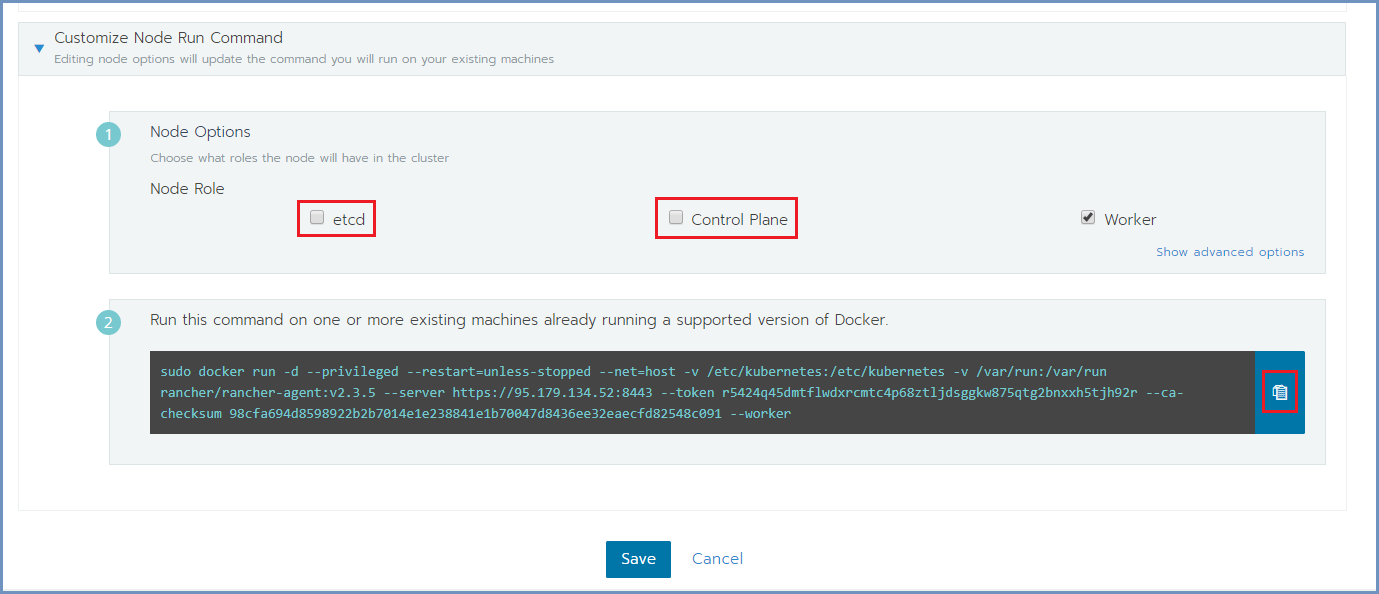
Run the copied command on EACH server node to join it to the cluster. Make sure the copied command matches the
node to join (Master/Worker). Follow the node joining by clicking on Nodes in the cluster menu.
Wait until the process is finished. After the node is joined to the cluster, a green message appears at the bottom of the page. Repeat this process per each node until the cluster is complete.
Set Node Labels
Set the node labels for each machine, according to the planned deployment:
In Rancher, select Nodes and for each node you wish to edit, select the Edit option from the menu on the right

In the Edit Node dialog, expand the Labels & Annotations section and add the desired labels to the node. For each label, set the value
accept. The possible labels are:
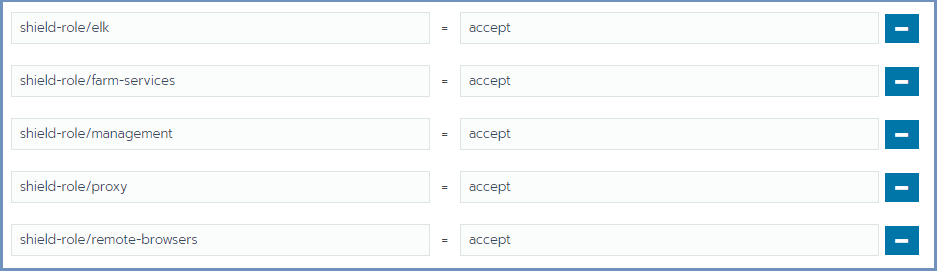
Labels can be added manually, one by one, or using copy/paste for one or more lines of the following labels:
shield-role/management=accept
shield-role/proxy=accept
shield-role/elk=accept
shield-role/farm-services=accept
shield-role/remote-browsers=accept
Press Save. The updated labels now appear on the node details:

Restart the system to apply the nodes that were added and the labels that were defined:
sudo ./stop.sh
sudo ./start.sh
Verify System Status
In Rancher, check under Workloads if the system is up and running. For more information see here.
Run ELK On NFS (Optional)
ELK is running locally (by default). It is highly recommended that ELK will run on a shared NFS folder, rather than locally.
To do that, edit the custom-values-elk.yaml file (located under ericomshield folder).
Update elasticsearchDataPath with the path to the shared NFS folder. Please also consider
updating the elasticsearchSnapshotPath.
Run the install-shield service again:
sudo ./install-shield.sh -p <PASSWORD>