Backup & Restore
Shield includes a backup and restore service to maintain availability of critical system configuration and logs. In case of system failure, the restore service can be used to restore configuration and/or logging information.
Note
All backup files are created locally. However, it is highly recommended that backup files be saved remotely, or on an NFS folder
Shield has three components that should be included in a backup plan:
- System files
- Service settings
- Logs
System Files
Ericom Shield system files are in two locations:
~/ericomshield/~/.kube/config
These two locations should be backed up on a regular basis.
Service settings
Ericom Shield service settings are stored in a local database. The system automatically creates a backup of this database during every save made in the Admin Console. In addition, the system also creates a full backup nightly.
The default location of these backups is ~/home/ericom/shield.
Change Default Location
To change the location of these backups, edit the custom-management.yaml file (located in ~/ericomshield) to update the local backup path.
Uncomment the localPath variable (located under the consulBackup section) and set it to the designated path:
localPath: <SPECIFIC_FOLDER_PATH>
Save the changes and deploy Shield, run:
./deploy-shield.sh
Remote Backup
Shield supports SFTP as a remote storage for backup files. Follow these steps to define the backup settings in the system.
Create a dedicated account for this purpose. This account will be used to store the backup files and to retrieve these files when restoring Shield.
On the SFTP server, create a SSH key. For more details, see here.
On the Rancher Server machine, edit the custom-management.yaml file (located in ~/ericomshield) to configure the SFTP account (backup path, SFTP server IP & username) and copy the
SSH private key. The settings that should be updated are marked with <>):
remotePath: "<BACKUP_PATH>"
    config: |
  rclone.conf: |
  [SFTPStorage]
  type = sftp
  host = <SFTP_SERVER_IP>
  user = <SFTP_USERNAME>
  key_file = /keys/key_file.pem

key: |
    key_file.pem: |
    ----BEGIN RSA PRIVATE KEY-----
    <PRIVATE_KEY>
    ----END RSA PRIVATE KEY-----
Save the changes and deploy Shield, run:
./deploy-shield.sh
Note
When editing the yaml file it is important to avoid any redundant characters (e.g. blank spaces, tabs etc.). In addition, it is recommended to back up this file.
Shield Service Settings Restore
In the event of system failure, on restart, Shield will automatically attempt to restore from the latest backup.
To perform a manual restore using a specific backup file, follow these steps:
In the Administration Console, go to Settings | Restore
Select and upload a file to restore and click the Restore Shield option.
For more info, please see here.
Shield Logs
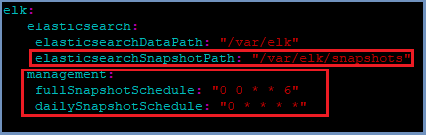
The system automatically takes snapshots of the log data on an hourly/daily/weekly schedule. These snapshots are saved locally in ~/var/elk/snapshots.
Settings are defined in the custom-values-elk.yaml file (located in ~/ericomshield). To customize it, retrieve the latest custom-values-elk.yaml file
and edit the relevant settings:
curl -s -o custom-values-elk.yaml https://raw.githubusercontent.com/EricomSoftwareLtd/Shield/Rel-20.01.2/Kube/scripts/custom-values-elk.yaml
Note
When editing the yaml file it is important to avoid any redundant characters (e.g. blank spaces, tabs etc.). In addition, it is recommended to back up this file.
Change Default Location
To change the location of these backups - update the elasticsearchSnapshotPath setting to a locally mounted NFS folder.
Change Default Schedule
To customize the backup schedule settings, update the fullSnapshotSchedule and dailySnapshotSchedule settings respectively (using CRON syntax).
Shield Logs Restore
In case logs data is lost and needs to be restored, Go to Admin | Reports | Advanced and open Kibana. Open Kibana | Dev Tools | Console.
Follow the steps detailed below - enter the queries in the Kibana console and press the arrow, e.g.:
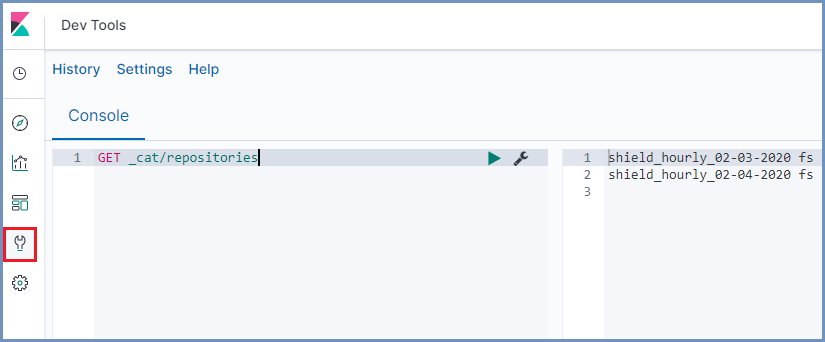
List all registered repositories to check if the desired repository is registered:
GET _cat/repositories
If desired repository is missing from search results mentioned above, but does exist in the file system, register it:
PUT /_snapshot/<REPOSITORY_NAME>
{
    "type": "fs",
    "settings": {
        "location": "REPOSITORY_NAME",
        "compress": true
    }
}
List snapshots in the repository:
GET _cat/snapshots/<REPOSITORY_NAME>
Restore a specific snapshot:
POST /_snapshot/<REPOSITORY_NAME>/<SNAPSHOT_NAME>/_restore
{
    "indices": "-.*kibana*",
    "ignore_unavailable": true
}
For more info see here.