How To Set A High Availability Cluster
To set up a Shield system with a Rancher cluster, to allow for high availability, please follow the steps detailed below.
Prepare The Nodes
The number of nodes required for a HA cluster, is the number of Shield servers (per the desired deployment) with the following additional nodes:
- 1 node for administrator workstation
- 2 nodes for load balancing proxy acting as a gateway to the Rancher Cluster.
Note
Additional LB nodes can be used, but 2 LB nodes is the minimum for HA.
<Total#ofNodes> = <#ofShieldServers> + <2LBServers> + <1AdminWS>
E.g. a Shield system of 5 nodes (3 managers, 2 browser farm) with RancherHA will require 8 nodes.
Note
Please see the Shield Architecture page, for the recommended deployment.
Software Requirements
- Linux Ubuntu Server 18.04 (64-bit, not workstation)
- Has a fixed IP Address
- Has a unique hostname
- Has the same user <USER> and password as the other nodes
- Has the same timezone (as other machines in the system)
- Has SSH server installed
Shield nodes should have these requirements. The other nodes (LB and administrator workstation) should have the minimum amount of memory and CPU resources.
Make sure that a local, accessible, DNS server exists for this system.
Configure Administrator Workstation
Make sure the WS has ssh-keygen and ssh-copy-id programs
Clone the Shield repository to the WS:
git clone --branch Rel-20.03 --single-branch https://github.com/EricomSoftwareLtd/Shield.git && cd Shield/Kube/scripts/RKE
Install latest stable version of Kubectl (available here):
curl -LO https://storage.googleapis.com/kubernetes-release/release/`curl -s https://storage.googleapis.com/kubernetes-release/release/stable.txt`/bin/linux/amd64/kubectl
chmod +x ./kubectl
sudo mv ./kubectl /usr/local/bin/kubectl
kubectl version –client
The result is:
Client Version: version.Info{Major:"1", Minor:"18", GitVersion:"v1.18.0", GitCommit:"9e991415386e4cf155a24b1da15becaa390438d8", GitTreeState:"clean", BuildDate:"2020-03-25T14:58:59Z", GoVersion:"go1.13.8", Compiler:"gc", Platform:"linux/amd64"}
Install latest stable version of helm 2. (APP_VERSION=v2.16.5):
curl -fsSL https://raw.githubusercontent.com/kubernetes/helm/master/scripts/get -o /tmp/get_helm.sh
chmod +x /tmp/get_helm.sh
sudo /tmp/get_helm.sh -v "$APP_VERSION"
rm -f /tmp/get_helm.sh
Install RKE:
wget https://github.com/rancher/rke/releases/download/v1.0.6/rke_linux-amd64
chmod +x rke_linux_amd64
Install Docker on all nodes (using shield-prepare-servers):
cd ../
curl -s -L -o shield-prepare-servers https://github.com/EricomSoftwareLtd/Shield/releases/download/shield-prepare-servers-Rel-20.03/shield-prepare-servers
chmod +x shield-prepare-servers
./shield-prepare-servers [-u <USER>] <SERVERIPADDRESSES>
Replace the <USER> with the user that matches ALL nodes. Replace the <SERVERIPADDRESSES> with the list of IP addresses of ALL nodes in the system.
Make sure all the nodes are accessible via SSH under the <USER> account from the WS, using SSH public keys. Run the following to generate a key pair and distribute the public key across all nodes (must be done each node separately). For more info go here:
ssh-keygen
ssh-copy-id <IPADDRESSNODE1>
ssh-copy-id <IPADDRESSNODE2>
ssh-copy-id <IPADDRESSNODE3>
.
.
.
In case the key pair was not placed in the default path, add the path parameter in the
rancher-cluster.ymlas:ssh_key_path: <path>/id_rsa
DNS
Create a FQDN record in the DNS server to point to the LB nodes. A single record pointing to all LB nodes in the system.
Edit the common file - Set the RANCHER_LB_HOSTNAME to the FQDN Record
Certificates
To use an existing CA certificate (or chain of certificates), go to ~/Shield/Kube/scripts and save it as cacerts.pem.
In addition, generate a server certificate for the FQDN Record and save it, along with the matching private key, in the same directory under the names
cert.crt and cert.key respectively.
In case there are no existing CA certificates, create a new CA certificate and a new server certificate (plus its matching keys respectively) to be used by the Rancher cluster, run:
cd RKE/
./generate_ca.sh    (creates a new CA certificate & key)
./generate_cert.sh  (creates a new server certificate & key)
Configuration File
The configuration of the entire system is defined in the rancher-cluster.yml file. This file is edited to include the system configuration and then later used to deploy it.
LB nodes are marked with system-role/ingress-rancher: accept label. Copy the related section for each LB node. E.g. for 2 nodes, the file should include:
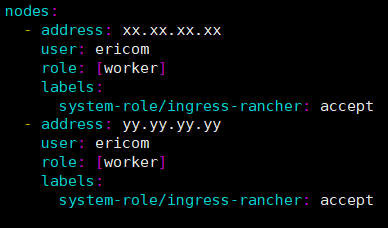
Update the user: <USER> - use the user mentioned above.
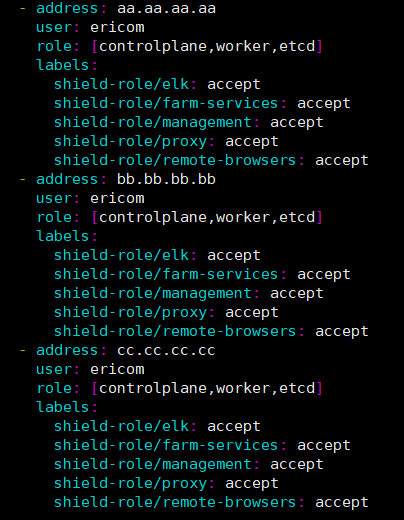
Shield Manager nodes are marked with role: [controlplane,worker,etcd].
Worker nodes are marked with role: [worker].
Modify the file to include references to all the Shield nodes in the system. Match the labels/shield-role (e.g. management, proxy, elk, farm-services, remote-browsers) per each node, as per the planned Shield deployment. E.g.:
Change the kubernetes_version to be v1.17.4-rancher1-2.
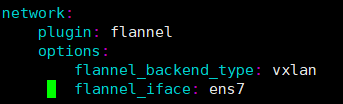
In case users have servers with multiple network interface cards, it is required to specify the interface name that was used for communication on the local network, in the flannel_iface (under network/options)
Save the changes.
Deploy Rancher
Build and deploy the Rancher cluster. Run:
./0_rke_up.sh
./1_install_tiller.sh
./2_deploy_rancher.sh
Make sure there are no fatal errors and wait for the Rancher to be deployed successfully.
Note
certain errors may appear, e.g. “Error from server (NotFound): secrets “tls-ca” not found”. These may be ignored.
Open Rancher UI - go to https://<RANCHER_LB_HOSTNAME>:8443 in your browser. Follow the instructions (e.g. set password). Make sure Rancher works with no errors, that
local cluster is imported and functions with no errors (may take a short while to be ready).
Copy the config file to the proper location:, under .kube:
cp kube_config_rancher-cluster.yml ~/.kube/config
Deploy Shield
Proceed to regular Shield installation procedure, run:
./add-shield-repo.sh -p <password>
./deploy-shield.sh
In Rancher, move the namespaces to be under Default project.
Shield is now installed with Rancher HA
Update Existing Cluster
To update an existing, running cluster (e.g. when a new Rancher version is released or additional nodes need to be added to Shield system), modify the rancher-cluster.yml
as needed, save it and run:
./0_rke_up.sh
The new configuration is now applied to the cluster and the cluster is updated.