Installation & Deployment
Warning
この方法は、Ericom社がワールドワイドでリリースしている最新バージョンを導入するための手順です。参考としてそのまま記載を残しています。日本では独自にサポート可能なバージョンを限定してリリースしています。そのため、shield-setup.sh および shield-update.sh によって導入可能なものだけがサポート対象です。下記のドキュメントについては、サポート対象外ですご了承ください。
Shield can be installed in 2 main methods:
- Using the Installation Scripts (can be used for Ubuntu and CentOS)
- Using the OVA file (for Ubuntu)
Shield components are deployed on Linux machines using Rancher. Rancher is a well-known software platform that enables easy deployment and management of Docker and Kubernetes products in production environments.
First step is to create the Kubernetes cluster (using Rancher) and once the cluster is ready - deploy Shield on it.
The recommendation is to set up a dedicated Linux machine which will be used for cluster deployment and management. This machine will be referred to as the Rancher Server machine. This machine will also include the Kubectl & Helm on it (see below). The Rancher Server can be a separated machine or on one of the Master machines (running etcd & Control Plane).
Note
For High Availability deployments, 3 Master (cluster management) machines are required.
The process detailed below is dedicated to installing using the Installation Scripts. When installing using the OVA, some steps can be skipped (due to the components that are included in the OVA). For detailed instructions on installing using the OVA go to:
Note
The process detailed below includes steps performed both on the Rancher Server machine and on the Rancher user interface (using a browser). The steps describe where it takes place (either in Rancher or Linux).
Note
When using Ubuntu 16.04 for a Kubernetes system, some steps are needed for Kubernetes to run successfully. For more details, go here.
Prepare The Rancher Server
On the Linux Rancher Server machine, download and run this service:
curl -s -o install-shield.sh https://raw.githubusercontent.com/EricomSoftwareLtd/Shield/Rel-20.01.2/Kube/scripts/install-shield.sh
chmod +x install-shield.sh
sudo ./install-shield.sh
Prepare The Server Nodes
Each server node that takes part in the Shield cluster must be prepared before creating the cluster. From the Linux Rancher Server machine run:
curl -s -L -o shield-prepare-servers https://github.com/EricomSoftwareLtd/Shield/releases/download/shield-prepare-servers-Rel-20.01.2/shield-prepare-servers
chmod +x shield-prepare-servers
./shield-prepare-servers [-u <USER>] <SERVERIPADDRESSES>
<SERVERIPADDRESSES> represents the IP addresses of all the server nodes (that will form the cluster). Multiple IP addresses may be entered, separated by a space (” “).
E.g.:
./shield-prepare-servers -u ericom xx.xx.xx.xx yy.yy.yy.yy zz.zz.zz.zz
Note
The Kernel may be updated during this process (if required).
Now, perform these steps on ALL the machines in the cluster (both Rancher Server machine and server nodes):
Add current user to the docker group:
sudo usermod -aG docker "$USER"
Logout and login again.
Verify that Docker is installed properly:
docker version
All the machines should be synchronized. Configure the NTP (Network Time Protocol) and the timezone on the machine.
Create The Cluster
Init Rancher
Open a browser and go to https://RancherServerIPAddress:8443 (using the Rancher Server IP address).
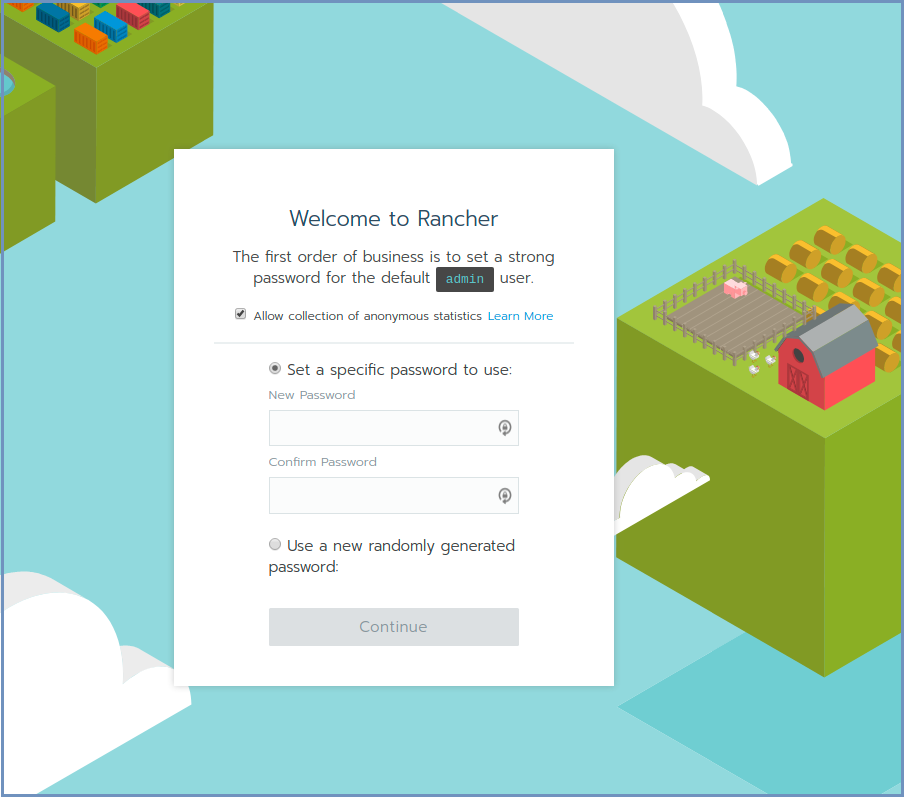
Set the administrator password (as desired) and click Continue

Click Save URL.
Form A Cluster & Add Nodes
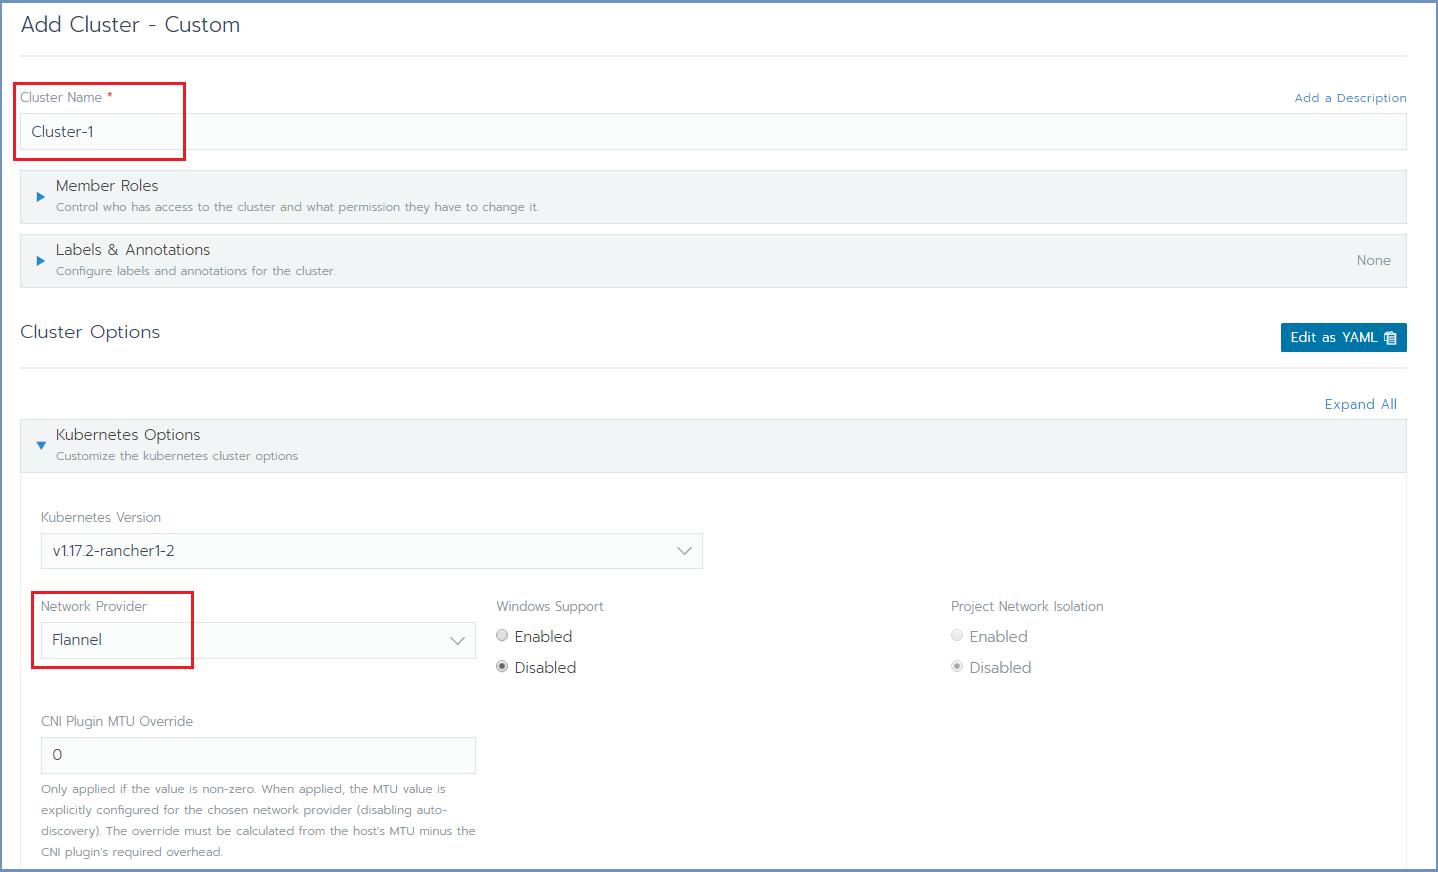
In Rancher, click the Add Cluster option (on the right) and select the From existing nodes (Custom) option.

Fill in the Cluster Name.
Under the Cluster Options and on the Network Provider select the Flannel option. Click Next.
Select the required check boxes. For a Cluster Management node (Master machine), select all check boxes. For Worker node, select the Worker check box. E.g.,:
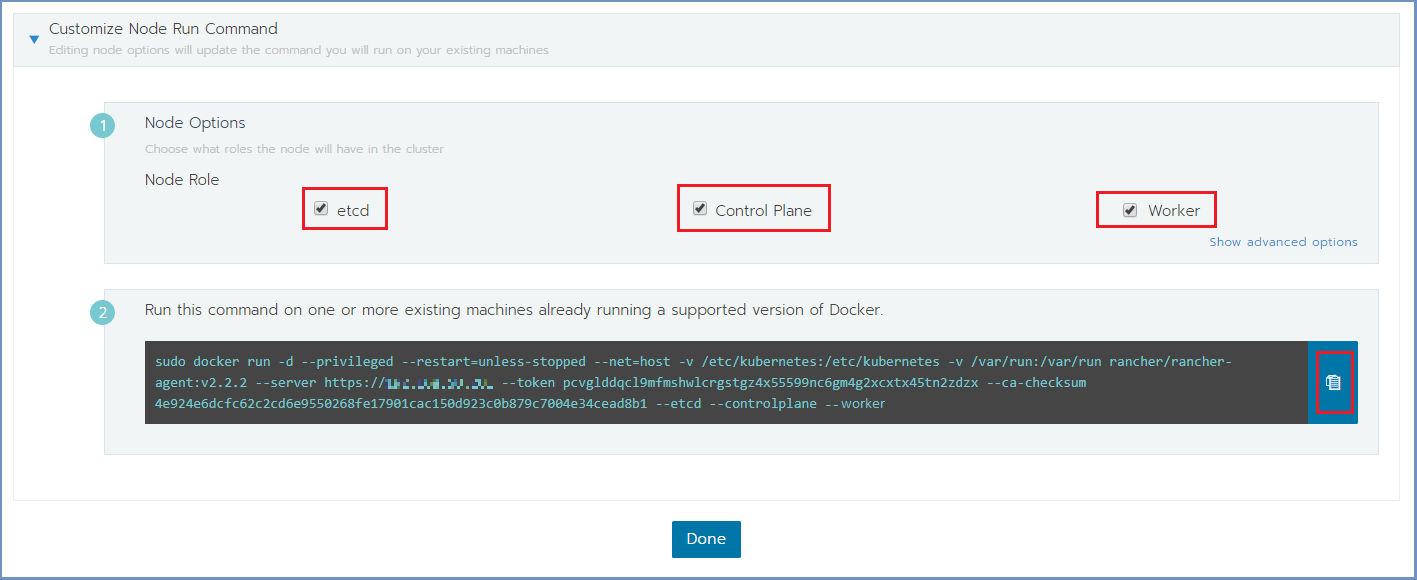
Copy the command on the bottom (using the Copy to Clipboard option in the right).
Run the copied command on EACH server node to join it to the cluster. Make sure the copied command matches the
node to join (Master/Worker). Follow the node joining by clicking on Nodes in the cluster menu.
Wait until the process is finished. After the node is joined to the cluster, a green message appears at the bottom of the page.
Repeat this process per each node until the cluster is complete. Click Done.
Set Node Labels
According to the planned deployment, set the node labels for each machine:
In Rancher, select Nodes and for each node you wish to edit, select the Edit option from the menu on the right
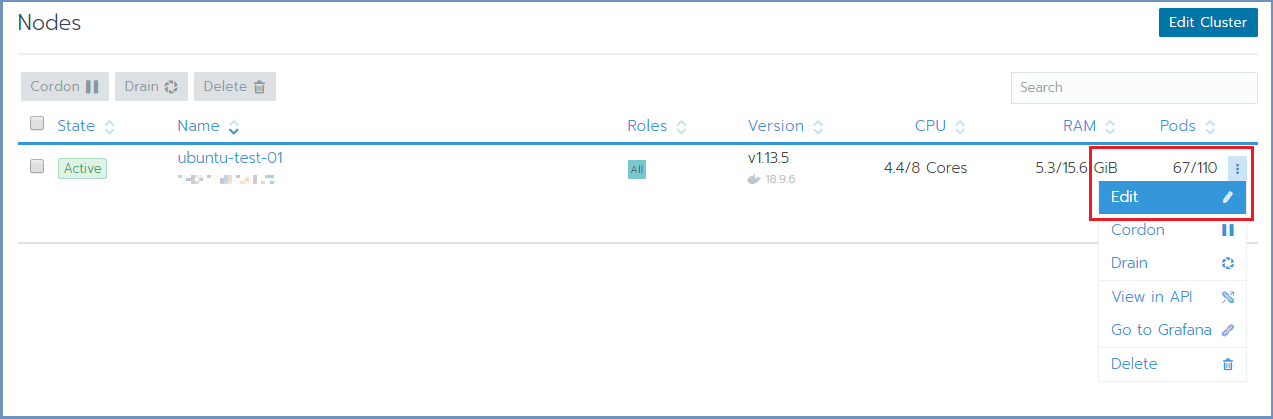
In the Edit Node dialog, expand the Labels & Annotations section and add the desired labels to the node. For each label, set the value
accept. The possible labels are:
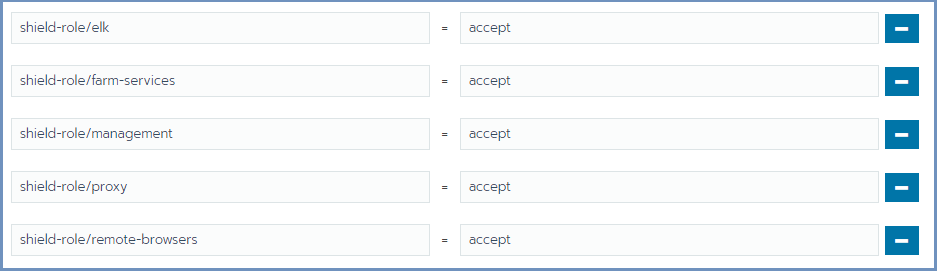
Labels can be added manually, one by one, or using copy/paste for one or more lines of the following labels:
shield-role/management=accept
shield-role/proxy=accept
shield-role/elk=accept
shield-role/farm-services=accept
shield-role/remote-browsers=accept
Press Save. The updated labels now appear on the node details:

The new Kubernetes cluster is now up and ready.
Update Kubeconfig
In Rancher, go to Cluster and select Kubeconfig File

Scroll down and select the Copy to Clipboard option. This will copy the content of the Kubeconfig file to the Clipboard.
On the Linux Rancher Server machine, edit (or create) the file named ~/.kube/config. Paste the clipboard content to the file.
Check that kubectl is configured properly (client and server):
kubectl version
The expected outcome is similar to:
Client Version: version.Info{Major:"1", Minor:"15", GitVersion:"v1.15.0", GitCommit:"e8462b5b5dc2584fdcd18e6bcfe9f1e4d970a529", GitTreeState:"clean", BuildDate:"2019-06-19T16:40:16Z", GoVersion:"go1.12.5", Compiler:"gc", Platform:"linux/amd64"}
    Server Version: version.Info{Major:"1", Minor:"17", GitVersion:"v1.17.2", GitCommit:"59603c6e503c87169aea6106f57b9f242f64df89", GitTreeState:"clean", BuildDate:"2020-01-18T23:22:30Z", GoVersion:"go1.13.5", Compiler:"gc", Platform:"linux/amd64"}
Note
If migrating from a legacy system, stop at this point and go to step 6 here.
Deploy Shield
Note
Shield repository requires a valid PASSWORD. Before you continue, contact Ericom Shield Professional Services to get a valid password.
Run the install-shield service a second time (this time with the -p parameter), to complete the Shield installation process:
sudo ./install-shield.sh -p <PASSWORD>
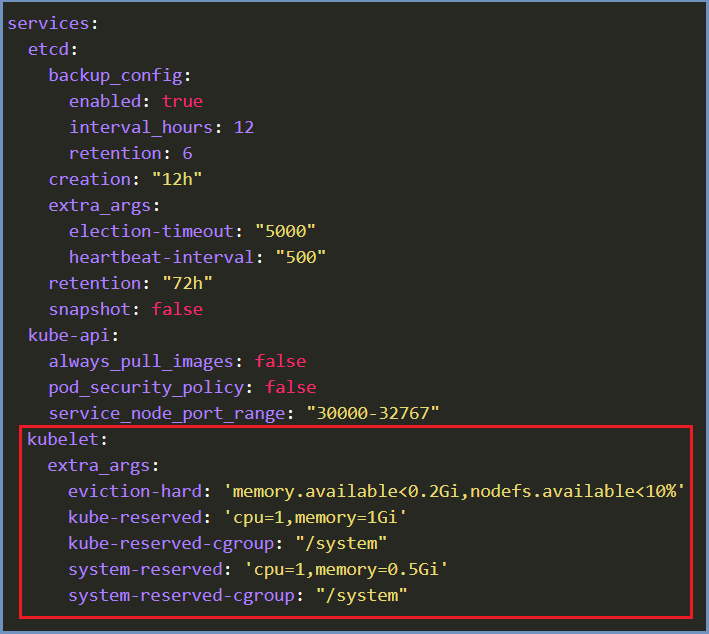
In Rancher, edit the newly created cluster. Select the Edit as YAML option. Scroll down to the services section. Under the
kubelet add the following lines:
extra_args:
  eviction-hard: 'memory.available<0.2Gi,nodefs.available<10%'
  kube-reserved: 'cpu=1,memory=1Gi'
  kube-reserved-cgroup: "/system"
  system-reserved: 'cpu=1,memory=0.5Gi'
  system-reserved-cgroup: "/system"
Please note that the correct indentation must be kept, using spaces only. Using tabs is not supporte in YAML and causes errors. Final result should look like this:
Run the install-shield service again:
sudo ./install-shield.sh -p <PASSWORD>
Move Shield-Services To Default Project
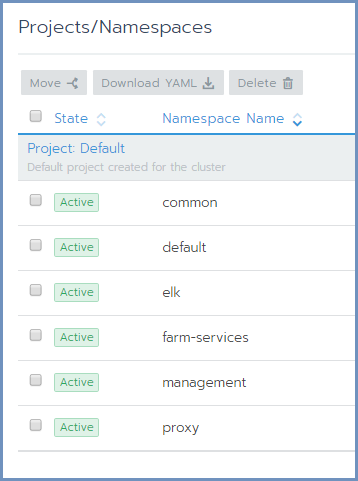
After Shield is deployed, the different namespaces (components) should be moved to be under the Default project, for easy display and access.
Under the cluster, there 5 namespaces: Management, Proxy, ELK, Farm Services & Common. There is also a default namespace, which exist by default under each cluster. The namespaces correspond with the Shield-Management, Shield-Proxy, Shield-Log, Farm Services and Common components respectively.
The Browsers component is a logical component, not represented by a namespace. This is because the browsers are created and managed by the Farm Services.
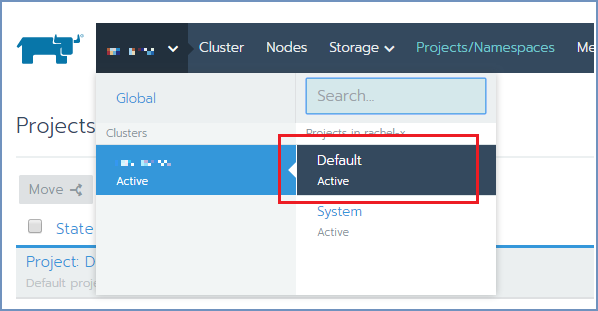
In Rancher, click on the Cluster. Then click on Projects/Namespaces. Select all Shield namespaces and click on the Move option
on top. Select Default and confirm. The Shield components are now displayed under the Default project.
Now, click on the cluster and select Default under the cluster name